

What Are Custom Attributes?
Custom Attributes are mappings between integration-specific attribute names and user-friendly labels that you define in Lumos. When you connect integrations like Okta, OneLogin, Microsoft Entra ID, or other identity providers, they may send user attributes with technical names (likecountryCode, employeeNumber, or departmentCode). Custom Attributes let you map these technical names to clear, meaningful labels (like “Location”, “Employee ID”, or “Department”) that make sense for your organization.
Key benefits:
- User-friendly labels: Transform technical attribute names into clear, understandable attribute names
- Consistent organization: Standardize how user information appears across Lumos
- Better filtering: Use meaningful attribute names when filtering users, accounts, and entitlements
- Access policy creation: Reference Custom Attributes in access policies and Access Reviews
Where to Configure Custom Attributes
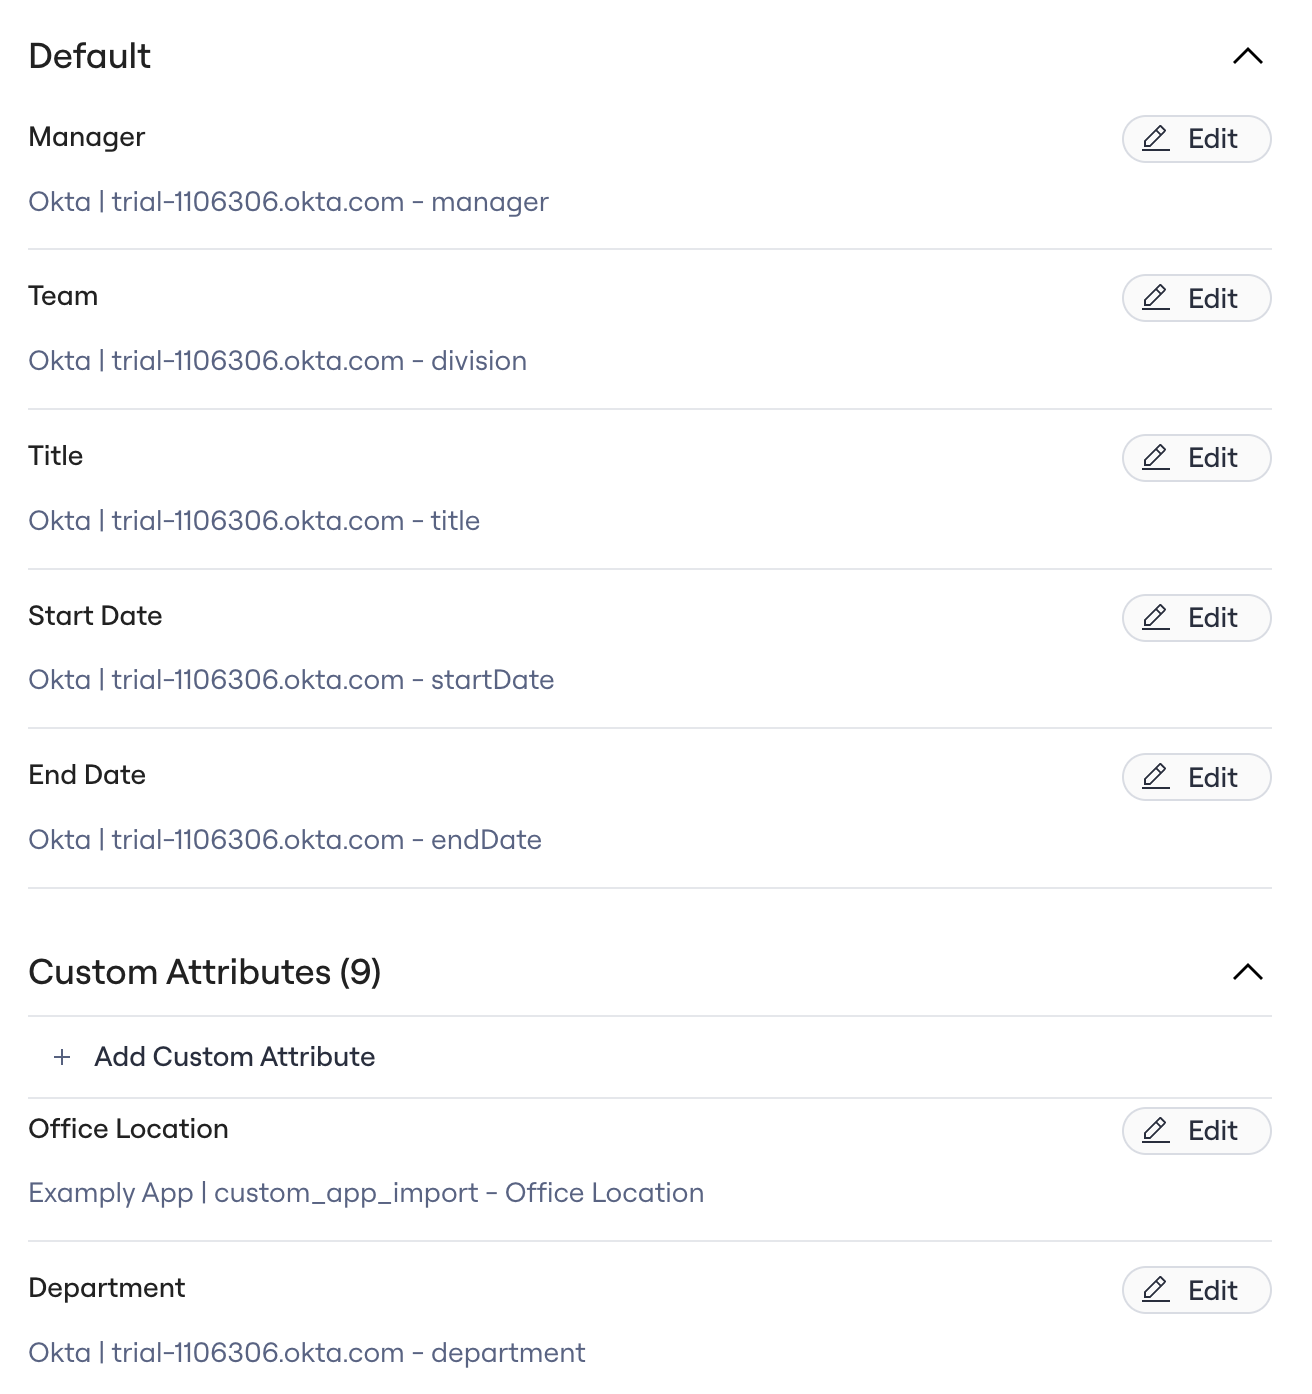
Custom Attributes are configured in the Source of Truth settings page. Navigate to: Settings → Source of Truth → Custom Attributes section The Source of Truth page has two sections: Default Attributes: Pre-configured attributes likeManager, Team, Title, Start Date, and End Date
Custom Attributes: Additional attributes you create to map integration attributes
An app does not have to be listed as a User Source in your Source of Truth to sync Default / Custom Attributes into Lumos
Types of Custom Attributes
When configuring a Custom Attributes in the Source of Truth settings, you can map it to two types of attributes from your integrations:Text Attributes
Map to text-based attributes from your integrations. These can store any string value like department names, locations, employee IDs, or other text information. Example: Map the integration attributecountryCode to a Custom Attribute labeled “Location” to display where each user is based.
User Attributes
Map to attributes that reference other users in your organization. These are useful for relationships like managers, team leads, or approvers. Example: Map an integration attribute that stores manager information to a Custom Attribute labeled “Manager” to establish reporting relationships.How Custom Attributes Work
Mapping Integration Attributes to Labels
When you create a Custom Attribute:- Choose a label: Give your Custom Attribute a clear, user-friendly name (e.g., “Department”, “Location”, “Employee ID”)
- Select the source: Choose which integration provides this attribute
- Map the attribute: Select the specific attribute name from that integration (e.g.,
dept,countryCode,employeeNumber) - Save the mapping: Lumos will now display this attribute using your custom label throughout the platform
Automatic Syncing
Once configured, Custom Attributes are automatically populated and kept up-to-date from your integrations:- Automatic updates: When your integration syncs, Custom Attribute values are updated automatically
- No manual entry: Values come directly from your source system
- Consistent data: All users see the same attribute names and values across Lumos
Common Use Cases
Organizing User Information
Map integration attributes to organize your user data:- Department: Map
deptordepartmentCodeto a “Department” Custom Attribute - Location: Map
countryCode,officeLocation, orcityto a “Location” Custom Attribute - Employee ID: Map
employeeNumberorempIdto an “Employee ID” Custom Attribute - Cost Center: Map cost center codes to a “Cost Center” Custom Attribute
Establishing Relationships
Use User-type Custom Attributes to map organizational relationships:- Manager: Map manager attributes to establish reporting relationships
- Team Lead: Map team leadership information for approval workflows
- Backup Contact: Map backup or secondary contact information
Filtering and Access Reviews
Once configured, Custom Attributes enable the following filtering:- Filter users by department to review access for specific teams
- Filter by location to audit access for users in specific regions
- Filter by employee type or cost center for targeted access reviews
Onboarding and Offboarding Policies
Use Custom Attributes in access policies:- Automatically assign access based on department Custom Attribute values
- Grant location-specific applications based on location Custom Attribute
- Apply different policies based on employee type or other Custom Attribute values
Within the Lumos Expression Language
Wherever in the Lumos Product the Lumos Expression Language is accessible, Custom Attributes can be accessed within that module. For example:- Set account attributes during Create Account or Update Account workflow steps based on Custom Attributes in the identities
- During Send Notification steps to access information about the user that is stored in the Custom Attributes
How to Configure Custom Attributes
Adding a New Custom Attribute
- Navigate to Settings → Source of Truth
- Scroll to the Custom Attributes section
- Click “Add Custom Attribute”
- Enter a user-friendly label for your Custom Attribute (e.g., “
Department”, “Location”) - Select the integration that provides this attribute
- Choose the specific attribute name from that integration
- If the attribute references another user, indicate it’s a User-type attribute
- Save your configuration
Editing or Deleting Custom Attributes
- Edit: Click on an existing Custom Attribute to change its label or source mapping
- Delete: Remove a Custom Attribute if it’s no longer needed (this won’t delete the underlying data)
Best Practices
Naming Your Custom Attributes
- Use clear, descriptive names that your team will understand
- Be consistent with naming conventions across your organization
- Avoid abbreviations unless they’re widely understood
- Consider how the attribute will appear in filters and reports
Choosing the Right Source
- Select the integration that is the most reliable source for this information
- If multiple integrations provide the same attribute, choose the one with the most accurate data
- Consider which integration syncs most frequently
Data Quality
- Ensure your source integration has clean, consistent data
- Regularly verify that Custom Attribute values are syncing correctly
- Review Custom Attribute values as part of your access review process
Examples in Action
Example 1: Mapping Department Information
Your HR system (connected via Okta) stores department information in an attribute calleddept. You want to display this as “Department” throughout Lumos:
- Go to Settings → Source of Truth → Custom Attributes
- Click “Add Custom Attribute”
- Enter label: “Department”
- Select source: Okta
- Select attribute:
dept - Save
Example 2: Mapping Location for Access Policies
Your identity provider stores office location incountryCode, and you want to use this for location-based access policies:
- Create a Custom Attribute labeled “Location”
- Map it to the
countryCodeattribute from your identity provider - Use this Custom Attribute in access policies to automatically grant location-specific access
Example 3: Establishing Manager Relationships
Your integration provides manager information in amanagerEmail attribute:
- Create a Custom Attribute labeled “Manager” as a User-type attribute
- Map it to the
managerEmailattribute - This establishes manager relationships that can be used in approval workflows and access reviews
Example 4: To set account attributes during a Create Account workflow step
Your integration may provide Lumos the ability to set an account attribute when Lumos creates the account in the end system. For example, when creating an Entra account, Lumos gives the ability to set theEmployee ID attribute in the Entra account. To do this you can use the a Lumos Expression like the following:
Getting Help
If you need assistance with Custom Attributes:- Check your integration documentation to see what attributes are available
- Review the Source of Truth settings page to see available attributes from your connected integrations
- See Using the Lumos Expression Language in Workflows for more information on using Custom Attributes within the Lumos Expression Language
Custom Attributes make integration data more accessible and useful in Lumos. By mapping technical attribute names to clear, user-friendly labels, you can better organize your user information, create more effective access policies, and run more targeted Access Reviews.