> ## Documentation Index
> Fetch the complete documentation index at: https://docs.lumos.com/llms.txt
> Use this file to discover all available pages before exploring further.
# Managing Employee Leave with Automated Account Suspension
## After this article
You'll be able to configure Lumos to automatically suspend employee accounts when they go on extended leave and reactivate them upon their return—without losing any of their access permissions.
## Overview
When employees take extended leave (parental leave, sabbatical, medical leave, etc.), you may want to disable their accounts for security purposes without revoking their access. This ensures that when they return, all their previous access is automatically restored without requiring manual re-provisioning.
This guide shows you how to set up this "OnLeave" workflow using Lumos Access Policies and AppStore Permission Overrides.
## How It Works
The OnLeave workflow uses a clever approach:
1. **Going on leave**: When an employee's "on-leave" status changes to "yes", an Access Policy triggers a Permission Override that suspends their account
2. **Returning from leave**: When their status changes back to "no", the policy condition becomes false, triggering the deprovisioning workflow—which reactivates the account
**Important**: The logic is intentionally "backwards"—the provisioning action suspends the account, and the deprovisioning action reactivates it. This prevents access from being revoked entirely.
***
## Prerequisites
Before you begin, ensure you have:
* An identity attribute in your source of truth (e.g., Okta) to track leave status
* Admin access to Lumos AppStore and Access Policies
* The application(s) you want to manage (e.g., Okta) connected to Lumos
***
## Configuration Steps
### Step 1: Set Up the Identity Attribute
In your identity provider (e.g., Okta), create a profile attribute to track leave status:
**Attribute name**: `on-leave` (or similar) **Important - Use String Values, Not Booleans**:
* **Do NOT use**: Boolean `true/false` or numeric `1/0` values
* **Use instead**: String literals like `"yes"` or `"no"`
**Why?** Lumos currently displays falsey values (false, 0) as `null`, which currently prevents the policy from working correctly. String literals avoid this issue. This is a known limitation being addressed by the product team.
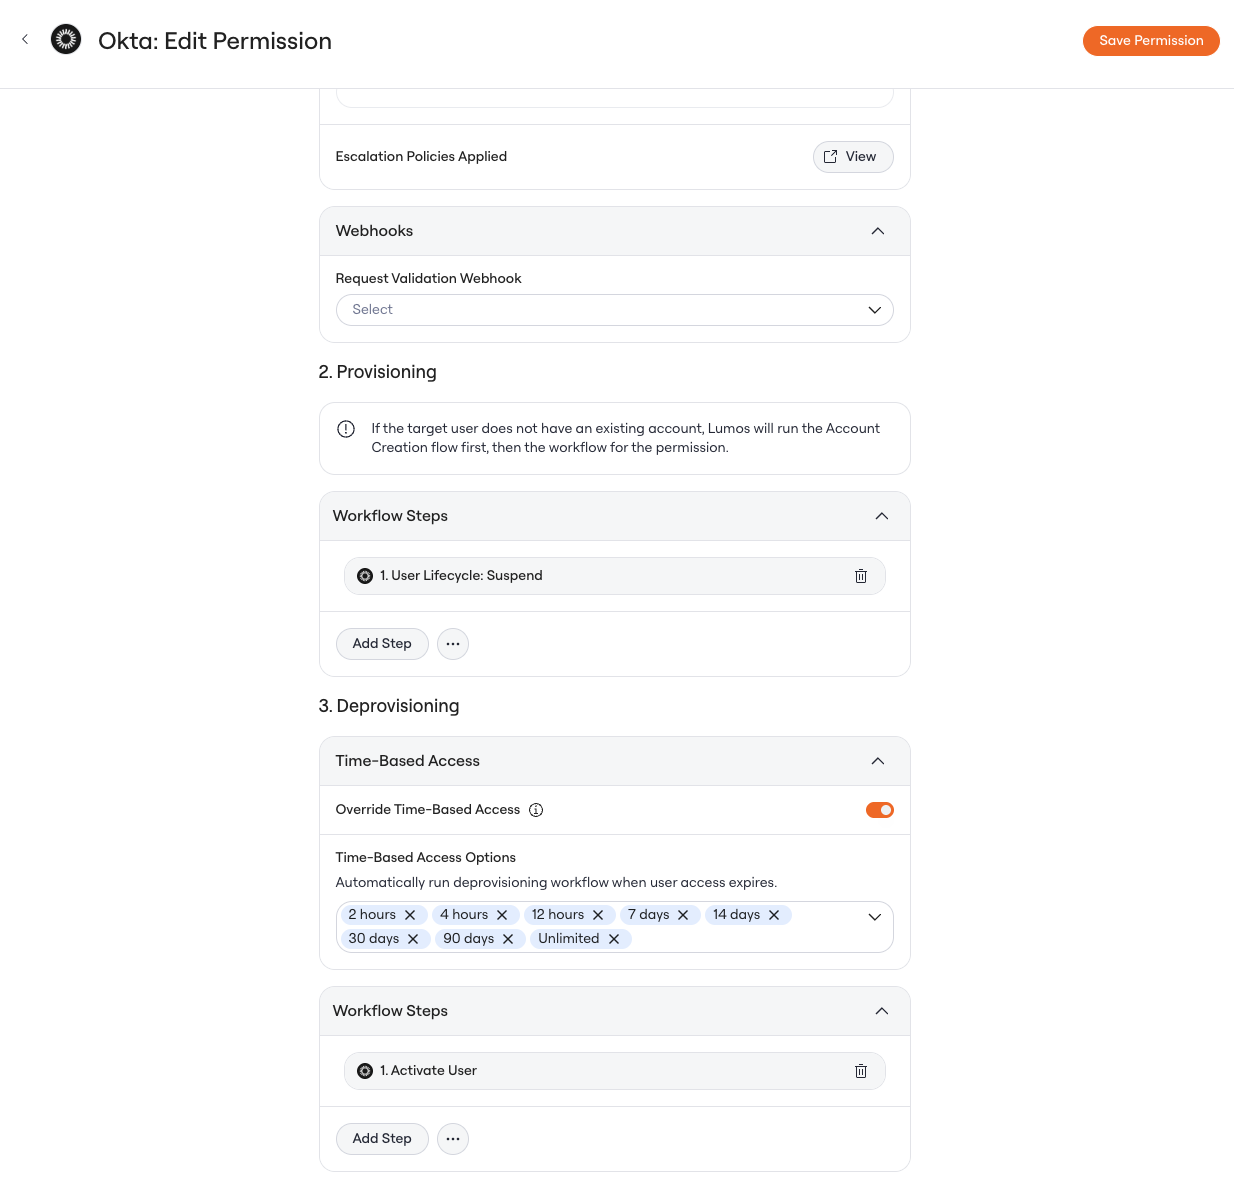
### Step 2: Create a Permission Override in AppStore
Navigate to **AppStore** and select the application you want to configure (e.g., Okta):
1. Click **Create Permission Override**
2. Name it **"Disable Account"** (or similar)
3. Configure the workflows:
**Provisioning Workflow** (when someone goes on leave):
* Action: **Suspend Account** (or "Deactivate User" depending on your app) - This action will be triggered when the Access Policy condition is true
**Deprovisioning Workflow** (when someone returns):
* Action: **Activate Account** (or "Activate User") - This action will be triggered when the Access Policy condition becomes false
1. Save the Permission Override
 ### Step 3: Create an Access Policy
Navigate to **Access Policies** and create a new policy:
1. **Policy Name**: "On Leave - Disable Accounts" (or similar)
2. **Application**: Select the same application from Step 2
3. **Permission**: Select the "Disable Account" Permission Override you created
4. **Condition**: Set up the trigger condition:
* **Attribute**: `on-leave` (or whatever you named your identity attribute) - **Operator**: `equals` - **Value**: `yes`
1. Save the Access Policy
You only need one Permission Override and one Access Policy per application.
## How to Test
### Test 1: Going on Leave
1. In your identity provider, change an employee's `on-leave` attribute to `yes`
2. Sync the identity provider in Lumos:
1. Go to **Integrations** - Find your identity provider - Click **Sync Accounts**
2. Wait for the sync to complete
3. Verify the account is suspended:
1. Go to the employee's identity page in Lumos - Check that their account status shows as **Suspended**
### Test 2: Returning from Leave
1. Change the employee's `on-leave` attribute back to `no`
2. Sync accounts in Lumos (as above)
3. Run an **identity sync** from your source of truth:
* Go to **Settings > Source of Truth** - Click **Sync Now**
1. Verify the account is reactivated:
* The employee's identity should show as **Active** - Check the **Activity Timeline** for onboarding/mover events - You should see an "Activate User" action in the deprovisioning flow
**Note**: After syncing accounts, you must also sync your source of truth to trigger the identity refresh that reactivates the user.
## Understanding the Activity Timeline
When reviewing the employee's activity timeline in Lumos, you'll see:
**Going on leave (Onboarding/Mover event)**:
* Event: "Access Policy Triggered"
* Action: The Permission Override provisions the "Disable Account" permission
* Result: Account suspended
**Returning from leave (Mover event)**:
* Event: "Access Policy Re-evaluated"
* Action: The deprovisioning workflow activates the account
* Result: Account reactivated with all previous access intact
## Expanding to Multiple Applications
To implement this workflow across multiple applications:
1. Create a separate **Permission Override** in each app's AppStore configuration
2. Create a separate **Access Policy** for each app
3. All policies can use the same `on-leave` identity attribute as the trigger
This modular approach provides flexibility to control which applications should be suspended during leave.
***
## Troubleshooting
**Problem**: The policy isn't triggering when I change the attribute **Solutions**:
* Verify you're using string values (`"yes"/"no"`), not booleans
* Ensure you've synced both the identity provider accounts AND the source of truth
* Check that the attribute name in your policy exactly matches the attribute in your identity provider
**Problem**: The account is suspended but not reactivated on return **Solutions**:
* Make sure you've synced the source of truth after syncing accounts—this triggers the identity refresh
* Verify the deprovisioning workflow in your Permission Override has an "Activate" action configured
**Problem**: Access was revoked instead of just suspended **Solutions**:
* Check your Permission Override configuration—you should NOT have any "revoke access" actions
* The provisioning step should ONLY suspend/deactivate the account
* The deprovisioning step should ONLY activate the account
***
## Need Help?
If you have any questions or need assistance configuring the OnLeave workflow, please contact your Lumos administrator or reach out to [support@lumos.com](mailto:support@lumos.com).
### Step 3: Create an Access Policy
Navigate to **Access Policies** and create a new policy:
1. **Policy Name**: "On Leave - Disable Accounts" (or similar)
2. **Application**: Select the same application from Step 2
3. **Permission**: Select the "Disable Account" Permission Override you created
4. **Condition**: Set up the trigger condition:
* **Attribute**: `on-leave` (or whatever you named your identity attribute) - **Operator**: `equals` - **Value**: `yes`
1. Save the Access Policy
You only need one Permission Override and one Access Policy per application.
## How to Test
### Test 1: Going on Leave
1. In your identity provider, change an employee's `on-leave` attribute to `yes`
2. Sync the identity provider in Lumos:
1. Go to **Integrations** - Find your identity provider - Click **Sync Accounts**
2. Wait for the sync to complete
3. Verify the account is suspended:
1. Go to the employee's identity page in Lumos - Check that their account status shows as **Suspended**
### Test 2: Returning from Leave
1. Change the employee's `on-leave` attribute back to `no`
2. Sync accounts in Lumos (as above)
3. Run an **identity sync** from your source of truth:
* Go to **Settings > Source of Truth** - Click **Sync Now**
1. Verify the account is reactivated:
* The employee's identity should show as **Active** - Check the **Activity Timeline** for onboarding/mover events - You should see an "Activate User" action in the deprovisioning flow
**Note**: After syncing accounts, you must also sync your source of truth to trigger the identity refresh that reactivates the user.
## Understanding the Activity Timeline
When reviewing the employee's activity timeline in Lumos, you'll see:
**Going on leave (Onboarding/Mover event)**:
* Event: "Access Policy Triggered"
* Action: The Permission Override provisions the "Disable Account" permission
* Result: Account suspended
**Returning from leave (Mover event)**:
* Event: "Access Policy Re-evaluated"
* Action: The deprovisioning workflow activates the account
* Result: Account reactivated with all previous access intact
## Expanding to Multiple Applications
To implement this workflow across multiple applications:
1. Create a separate **Permission Override** in each app's AppStore configuration
2. Create a separate **Access Policy** for each app
3. All policies can use the same `on-leave` identity attribute as the trigger
This modular approach provides flexibility to control which applications should be suspended during leave.
***
## Troubleshooting
**Problem**: The policy isn't triggering when I change the attribute **Solutions**:
* Verify you're using string values (`"yes"/"no"`), not booleans
* Ensure you've synced both the identity provider accounts AND the source of truth
* Check that the attribute name in your policy exactly matches the attribute in your identity provider
**Problem**: The account is suspended but not reactivated on return **Solutions**:
* Make sure you've synced the source of truth after syncing accounts—this triggers the identity refresh
* Verify the deprovisioning workflow in your Permission Override has an "Activate" action configured
**Problem**: Access was revoked instead of just suspended **Solutions**:
* Check your Permission Override configuration—you should NOT have any "revoke access" actions
* The provisioning step should ONLY suspend/deactivate the account
* The deprovisioning step should ONLY activate the account
***
## Need Help?
If you have any questions or need assistance configuring the OnLeave workflow, please contact your Lumos administrator or reach out to [support@lumos.com](mailto:support@lumos.com).