> ## Documentation Index
> Fetch the complete documentation index at: https://docs.lumos.com/llms.txt
> Use this file to discover all available pages before exploring further.
# Request Validation Webhooks
## Background
A big part of maintaining a least-privilege/zero trust environment is ensuring that people requesting access to apps have gone through required trainings or verifications to make sure they'll use it responsibly.
You can use *request validation webhooks* to automatically validate important info about a requester before they can get access to an app.
This article describes some common scenarios where request validation webhooks are deployed and how to set them up.
## Common use cases
If you're looking for inspiration, below are some sample scenarios where Lumos customers have used request validation webhooks to improve security posture and least-privilege.
* **Background Checks**
Before someone can request an app, you may want to make sure that a background check has been successfully completed.
You can create a request validation webhook that calls out to a third-party service to ensure that the background check is completed before they get access.
* **Required Training**
You may want to check whether an employee has completed a training before accessing a sensitive database. If an employee tries to request access before completing their training, you can customize the error message they will receive and ask them to complete the training first.
* **Enforcing SoD**
If someone already belongs to a role in an app, you may not want them to be able to request another role to enforce segregation of duties. Using request validation hooks, you can check someone's existing role(s) and block the request if they already are assigned to a role.
* **Role Verification**
You want to make sure that someone belongs to a certain role before they can request access to something. For example, a Sales Manager should not request admin access to Gong, which is reserved for Directors and above.
## What's sent in the webhook?
Lumos sends a JSON payload of access request data when the webhook is triggered. The format of this payload is below.
```
{
"application": {
"app_id": "demo_app",
"instance_id": "0ob3ggjlhx892dc4abcde",
"user_friendly_label": "Demo App"
},
"permissions": [
{
"label": "Permission One Label",
"value": "Permission One",
"type": "PERMISSION",
"source": "MANUAL"
},
{
"label": "Permission Two Label",
"value": "Permission Two",
"type": "PERMISSION",
"source": "MANUAL"
},
...
],
"user": {
"email": "peterparker@lumos.com",
"given_name": "Peter",
"family_name": "Parker"
},
"custom_fields": {
"username": "pparker"
}
}
```
## How should my script or workflow respond?
Please follow the general guidance on how to format your webhook responses here: [Creating Webhooks](/kb/integrations-3/webhooks/creating-webhooks)
The allowed "response" values for request validation webhooks can be found below.
**If the user should be allowed to have the app (Success)**
```
{
"response": "ACCEPT",
"msg": "The message you want the requester to see if their request is validated"
}
```
**If the user should not be allowed to have the app (Failure)**
```
{
"response": "REJECT",
"msg": "The message you want the requester to see if their request is not validated"
}
```
## Where can I use request validation webhooks?
Request validation webhooks are used in the AppStore. *See* [*What is the Appstore?*](/kb/appstore/configuring-your-appstore/what-is-the-appstore)
After you create a request validation webhook, you need to add it to an **app** or a **permission**for it to run. *See* [*Creating Webhooks*](/kb/integrations-3/webhooks/creating-webhooks)
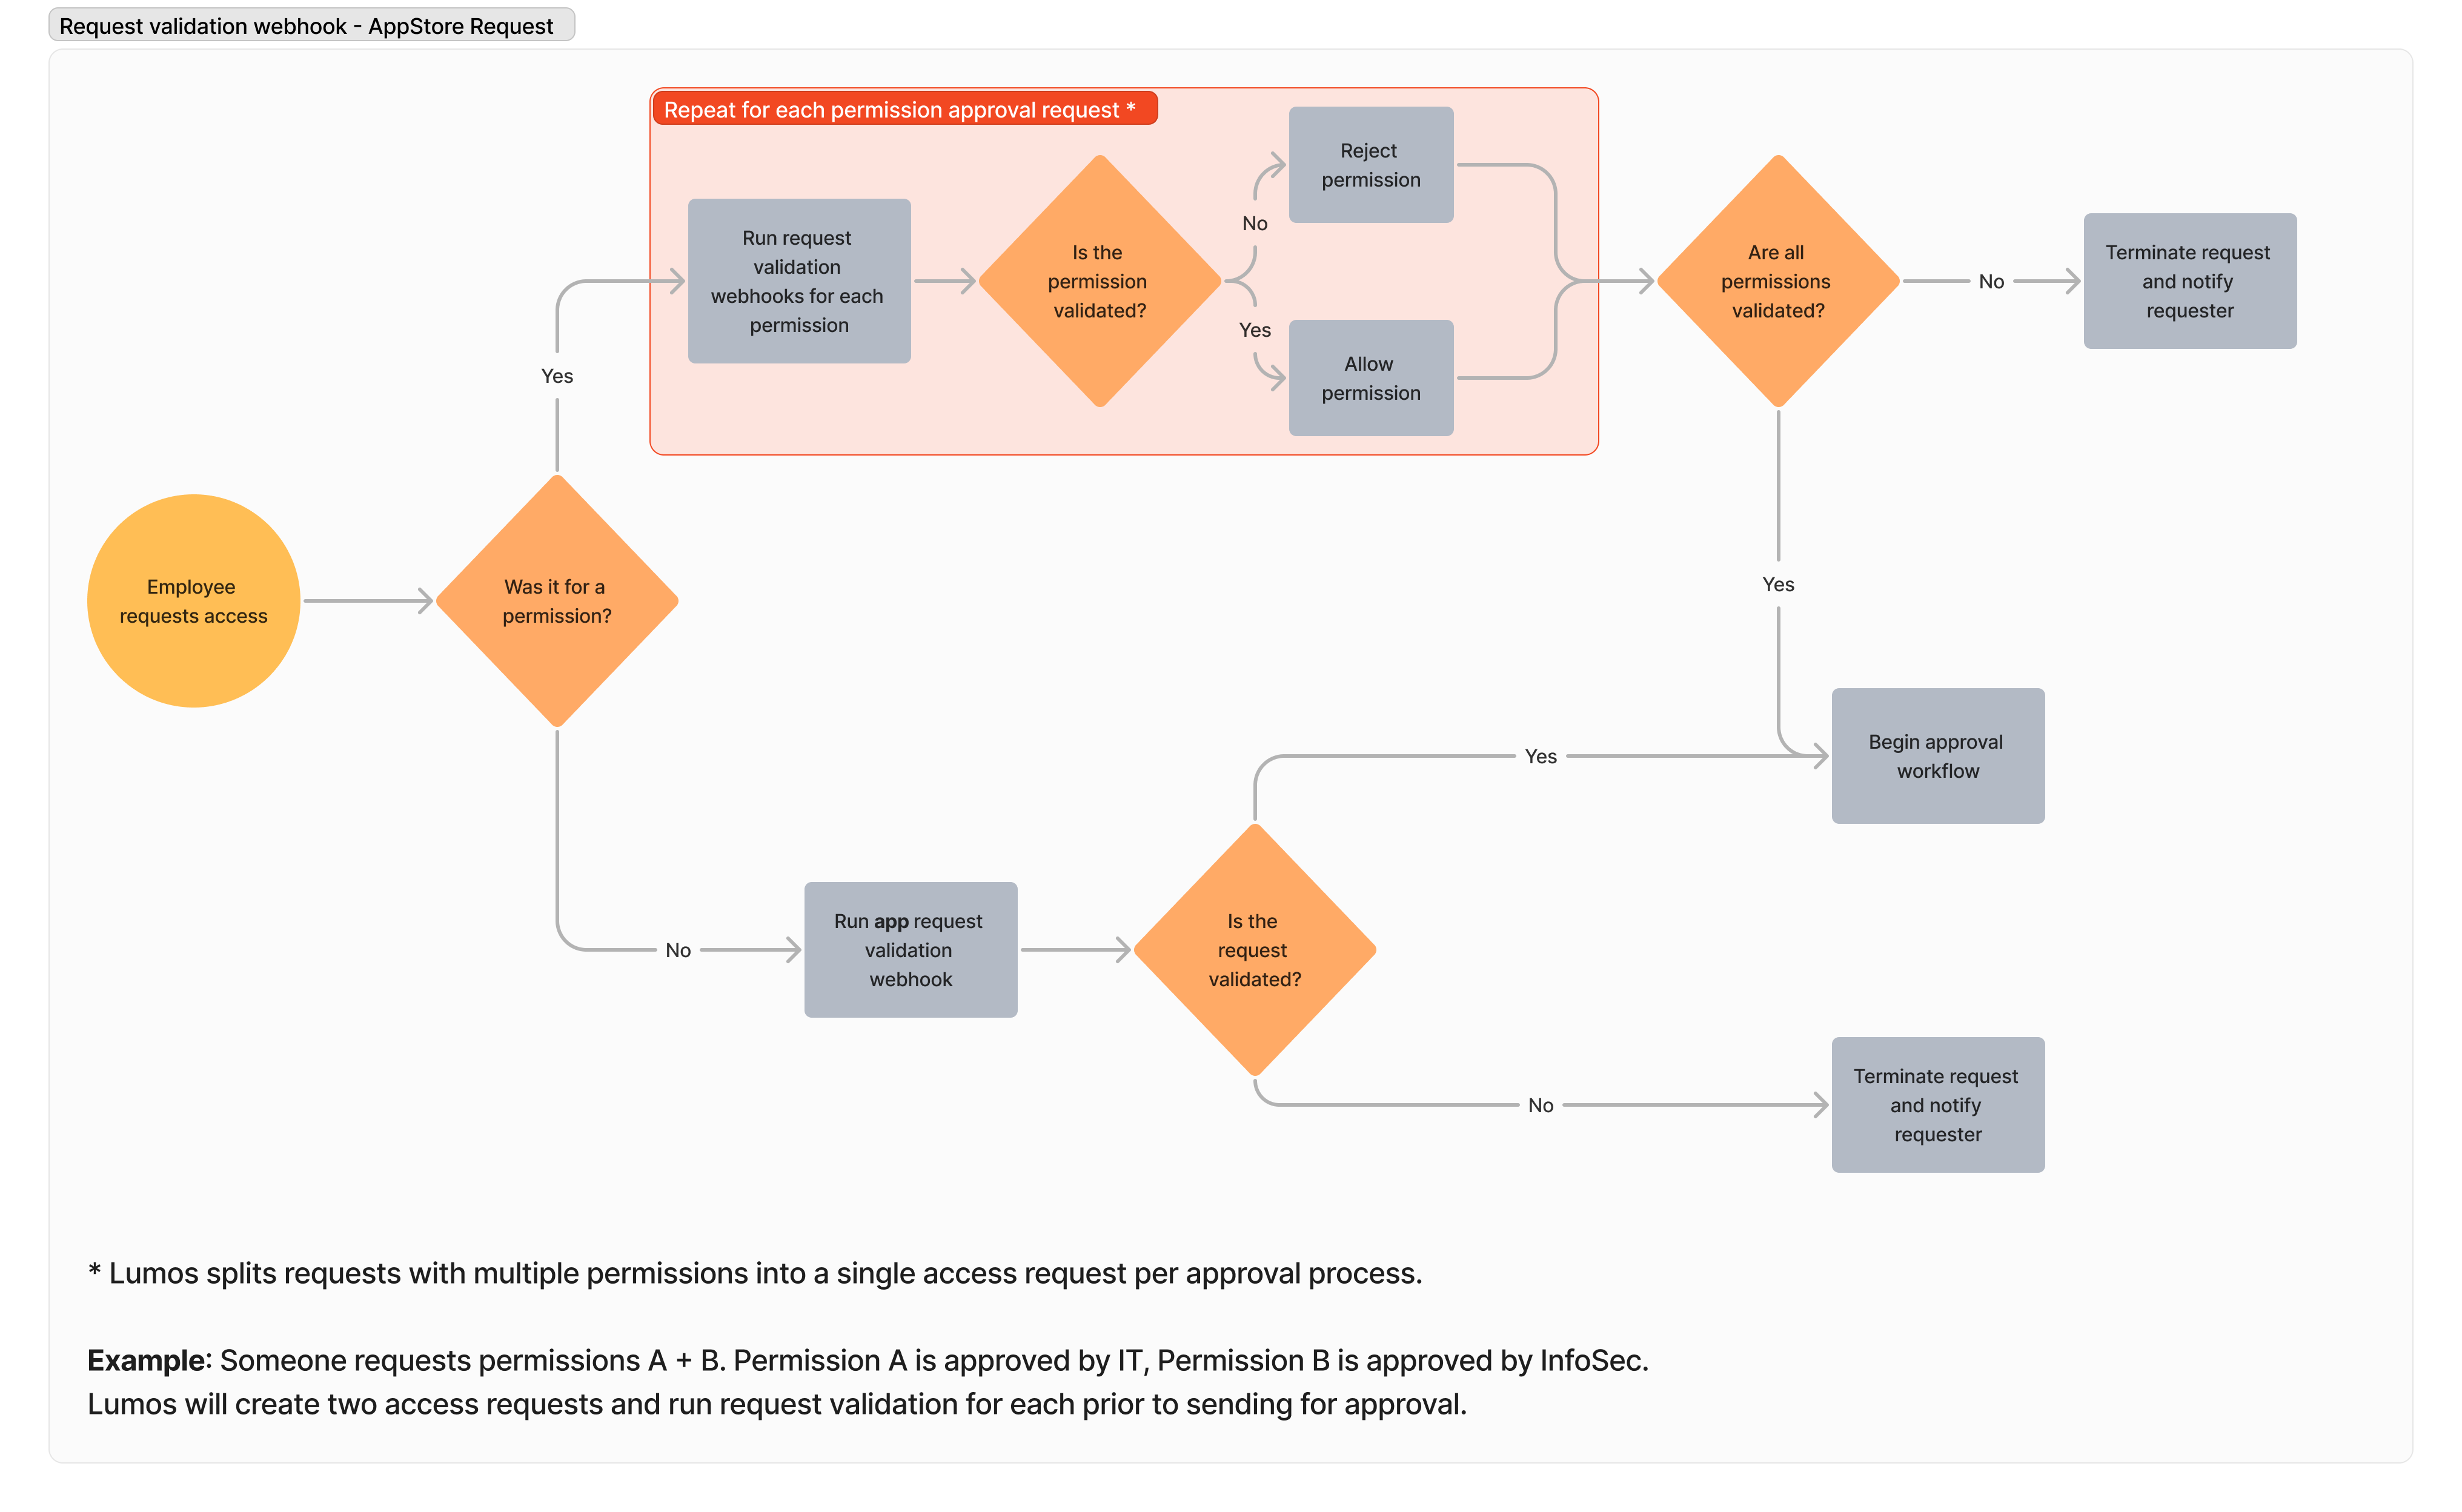
The diagram below shows how request validation webhooks work for **app** or **permission** webhooks. In short, if a user is being approved for a permission, use a **permission** webhook. For all other cases, use an **app** webhook.
 ## Configuring an AppStore request validation webhook
Guidance is [here](#where-can-i-use-request-validation-webhooks).
### 1. Go to your [AppStore apps](https://app.lumosidentity.com/admin-app-store) and find the app in question.
### 2. Click "Settings".
### 3. Find the "AppStore Setup" section and click the input box next to " Request Validation Webhook".
### **4. Select your webhook from the dropdown.**
## Example workflows
At the bottom of this article, you'll find working webhook scripts that you can use to get started with request validation webhooks.
**These workflows aren't production-ready** -- they parse the incoming webhook payload, perform a trivial check with the incoming data, then return a response in the format that Lumos expects. You can use these scripts as a way to quickly start creating webhooks of your own.
## Configuring an AppStore request validation webhook
Guidance is [here](#where-can-i-use-request-validation-webhooks).
### 1. Go to your [AppStore apps](https://app.lumosidentity.com/admin-app-store) and find the app in question.
### 2. Click "Settings".
### 3. Find the "AppStore Setup" section and click the input box next to " Request Validation Webhook".
### **4. Select your webhook from the dropdown.**
## Example workflows
At the bottom of this article, you'll find working webhook scripts that you can use to get started with request validation webhooks.
**These workflows aren't production-ready** -- they parse the incoming webhook payload, perform a trivial check with the incoming data, then return a response in the format that Lumos expects. You can use these scripts as a way to quickly start creating webhooks of your own.