> ## Documentation Index
> Fetch the complete documentation index at: https://docs.lumos.com/llms.txt
> Use this file to discover all available pages before exploring further.
# Pre-Approval Webhooks
## Background
Using pre-approvals is a fantastic way to level up your AppStore. It brings time to access to essentially *zero* and unblocks people from getting access in "break glass" scenarios. *See* [*Setting Up Pre-Approvals*](/kb/appstore/configuring-your-appstore/setting-up-pre-approvals)
You can use IdP/email groups to determine who is pre-approved, but that may not always be enough. In these cases, you can use *pre-approval webhooks* in addition to your other pre-approval conditions to verify whether someone should be pre-approved for an app.
This article describes some common scenarios where pre-approval webhooks are deployed and how to set them up.
## Common use cases
If you're looking for inspiration, below are some sample scenarios where Lumos customers have used pre-approval webhooks to improve security posture and least-privilege.
* **Role Verification**
Sometimes, whether a role should be pre-approved for access to an app is not as clear as checking their title or the groups they belong to. In these cases, a pre-approval webhook can be used to check your IdP or HRIS to verify that someone can be pre-approved for access.
* **On-Call Rotations**
If you're not using PagerDuty or Opsgenie to manage on-call rotations, where Lumos already has native integrations to pull in on-call schedules, you can create a pre-approval webhook to check whether an engineer is on-call, entitling them with pre-approved, time-based access to sensitive apps in "break glass" scenarios (ex. AWS RDS write access).
## What's sent in the webhook?
Lumos sends a JSON payload of access request data when the webhook is triggered. The format of this payload is below.
```
{
"application": {
"app_id": "demo_app",
"instance_id": "0ob3ggjlhx892dc4abcde",
"user_friendly_label": "Demo App"
},
"permissions": [
{
"label": "Permission One Label",
"value": "Permission One",
"type": "PERMISSION",
"source": "MANUAL"
},
{
"label": "Permission Two Label",
"value": "Permission Two",
"type": "PERMISSION",
"source": "OKTA"
},
...
],
"requester_user": {
"email": "peterparker@lumos.com",
"given_name": "Peter",
"family_name": "Parker"
},
"target_user": {
"email": "peterparker@lumos.com",
"given_name": "Peter",
"family_name": "Parker"
},
"account": {
"username": "webslinger",
"given_name": "Peter",
"family_name": "Parker",
"email": "peterparker@lumos.com"
},
"access_length": 43189,
"request_comment": "Give me access!",
"request_task_url": "http://lumosidentity.com/tasks?requestId=12898293343",
"custom_fields": {
"username": "pparker"
}
}
```
## How should my script or workflow respond?
Please follow the general guidance on how to format your webhook responses here: [Creating Webhooks](/kb/integrations-3/webhooks/creating-webhooks)
The allowed "response" values for pre-approval webhooks can be found below.
**If the user should be pre-approved for the app (Success)**
```
{
"response": "PREAPPROVED"
}
```
**If the user should not be pre-approved for the app (Failure)**
```
{
"response": "NOT_PREAPPROVED"
}
```
## Where can I use pre-approval webhooks?
Pre-approval webhooks are used in the AppStore. *See* [*What is the AppStore?*](/kb/appstore/configuring-your-appstore/what-is-the-appstore)
The diagram below shows how pre-approval webhooks work for **permission** webhooks.
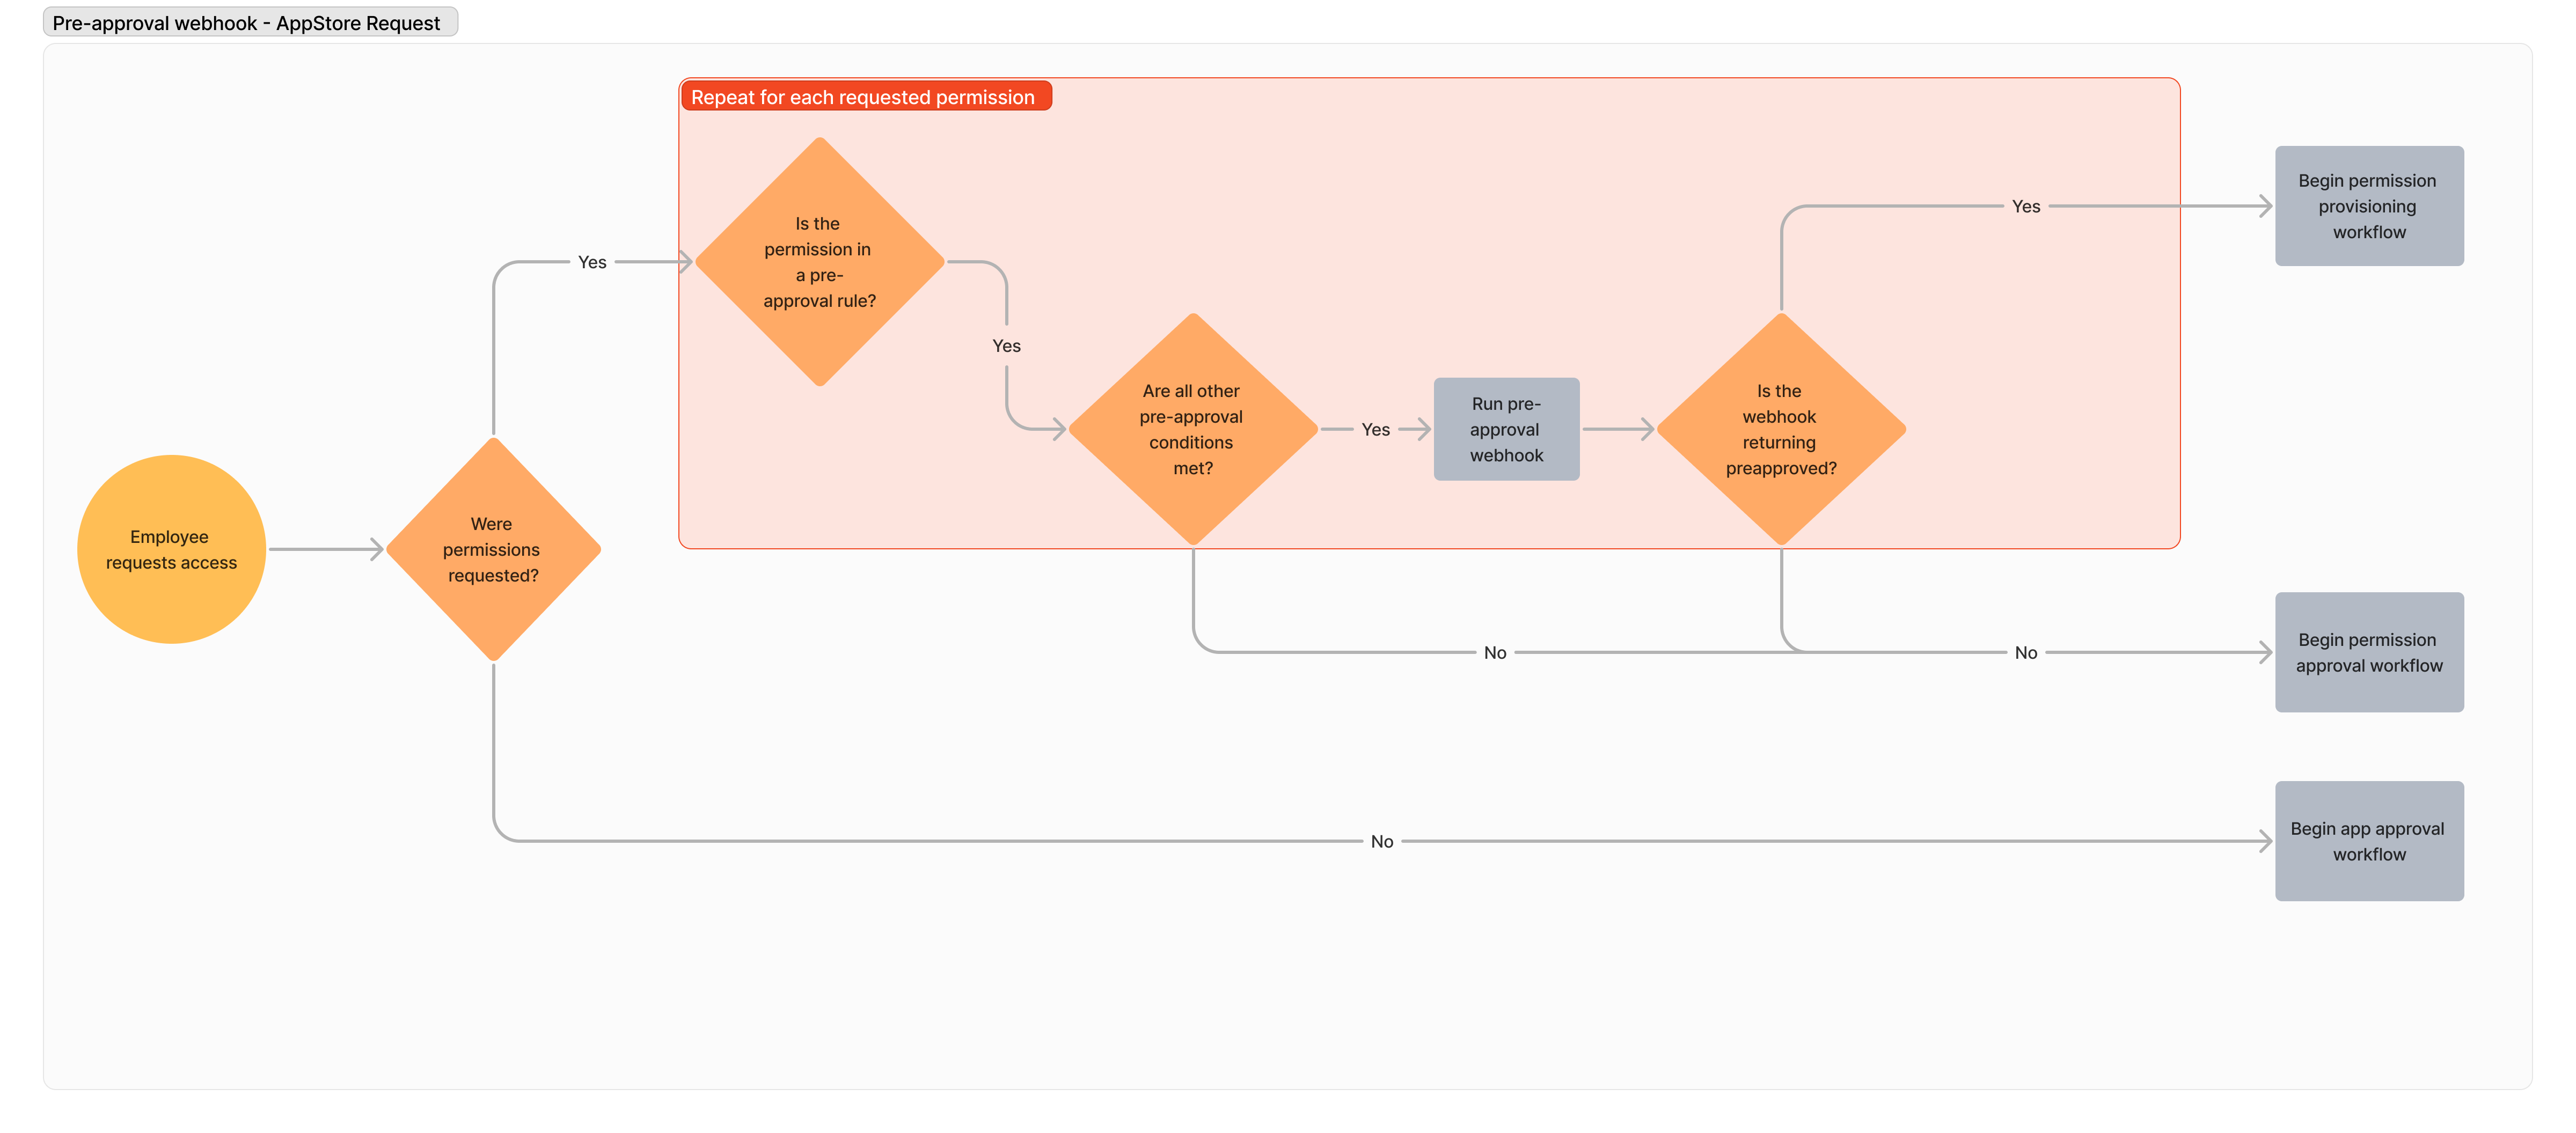 After you create a pre-approval webhook, you need to add it to a pre-approval rule for it to run. *See* [*Creating Webhooks*](/kb/integrations-3/webhooks/creating-webhooks)
## Configuring an AppStore pre-approval webhook
If you want to run a webhook as part of a pre-approval rule, follow these steps.
### 1. Go to your [AppStore apps](https://app.lumosidentity.com/admin-app-store) and find the app in question.
### 2. Click "Settings".
### 3. Click "Pre-approval rules", then create a new rule.
More guidance on pre-approval rules can be found here: [Setting Up Pre-Approvals](/kb/appstore/configuring-your-appstore/setting-up-pre-approvals)
### 4. In the *Add Advanced Conditions* section, select your Pre-approval webhook.
After you create a pre-approval webhook, you need to add it to a pre-approval rule for it to run. *See* [*Creating Webhooks*](/kb/integrations-3/webhooks/creating-webhooks)
## Configuring an AppStore pre-approval webhook
If you want to run a webhook as part of a pre-approval rule, follow these steps.
### 1. Go to your [AppStore apps](https://app.lumosidentity.com/admin-app-store) and find the app in question.
### 2. Click "Settings".
### 3. Click "Pre-approval rules", then create a new rule.
More guidance on pre-approval rules can be found here: [Setting Up Pre-Approvals](/kb/appstore/configuring-your-appstore/setting-up-pre-approvals)
### 4. In the *Add Advanced Conditions* section, select your Pre-approval webhook.
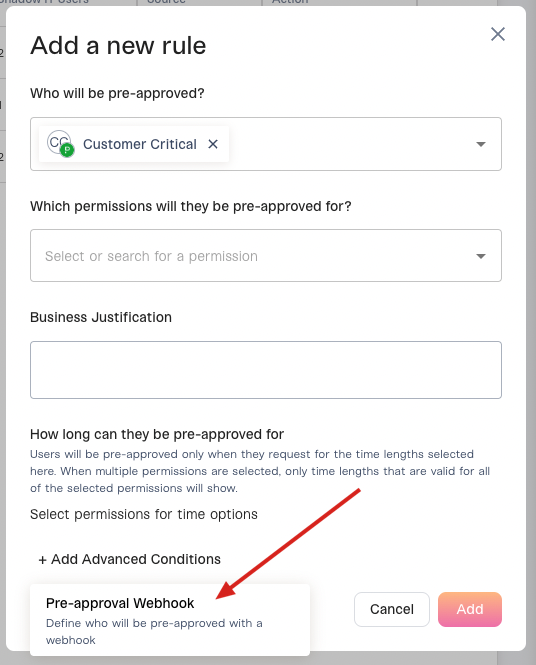 ### 5. Click "Add" to add your new rule.
## Example workflows
At the bottom of this article, you'll find working webhook scripts that you can use to get started with pre-approval webhooks.
**These workflows aren't production-ready** -- they parse the incoming webhook payload, perform a trivial check with the incoming data, then return a response in the format that Lumos expects. You can use these scripts as a way to quickly start creating webhooks of your own.
### 5. Click "Add" to add your new rule.
## Example workflows
At the bottom of this article, you'll find working webhook scripts that you can use to get started with pre-approval webhooks.
**These workflows aren't production-ready** -- they parse the incoming webhook payload, perform a trivial check with the incoming data, then return a response in the format that Lumos expects. You can use these scripts as a way to quickly start creating webhooks of your own.