> ## Documentation Index
> Fetch the complete documentation index at: https://docs.lumos.com/llms.txt
> Use this file to discover all available pages before exploring further.
# Configuring Account-to-Identity Matching Rules
**After this article...** You'll know how to set up custom rules for matching newly discovered accounts to the correct employee identities in your organization, ensuring proper access governance across all your applications.
## Background
When Lumos discovers new accounts in your applications, it needs to determine which employee owns each account. This process is called identity matching, and it's crucial for maintaining security and compliance across your organization.
By default, Lumos matches accounts to identities by comparing the email address on the account with the email address of your employees. However, this simple approach doesn't work in many real-world scenarios:
* **Email format changes**: Your company transitioned from `name@oldcompany.com` to `name@newcompany.com`, but some applications still use the old format
* **Missing email fields**: On-premises systems or platforms like GitHub may not have email addresses for users
* **Different identifiers**: Some applications use usernames, employee IDs, or other attributes instead of email addresses
When accounts aren't properly matched to identities, it can create serious compliance risks. Terminated employees' accounts might go undetected during access reviews, and offboarding workflows could miss critical accounts that need to be deprovisioned.
The Lumos Identity Matching Rules feature enables you to configure how accounts are matched to identities, so you can see who has access to what across your entire application portfolio.
***
## Configuring Matching Rules
### 1. Navigate to Your Application
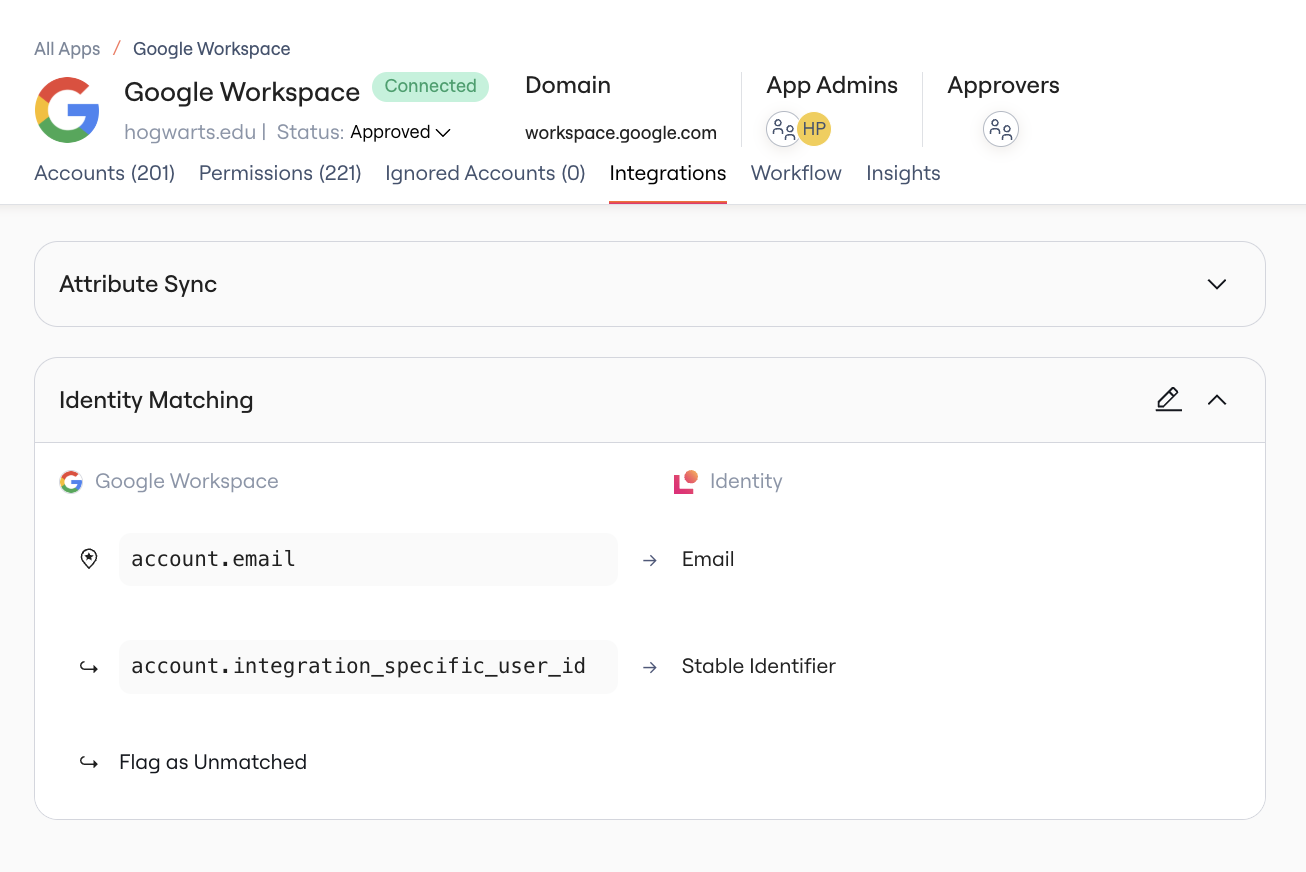
1. Go to the **All Apps** page
2. Click on the application you want to configure
3. Navigate to the **Integration** tab
4. Find the **Identity Matching** section
 ### 2. Review Your Default Rules
Every application starts with a default matching rule that compares the account's email address with the identity's email address. You'll see this rule listed as the first rule within the configuration.
### 3. Edit Matching Rules
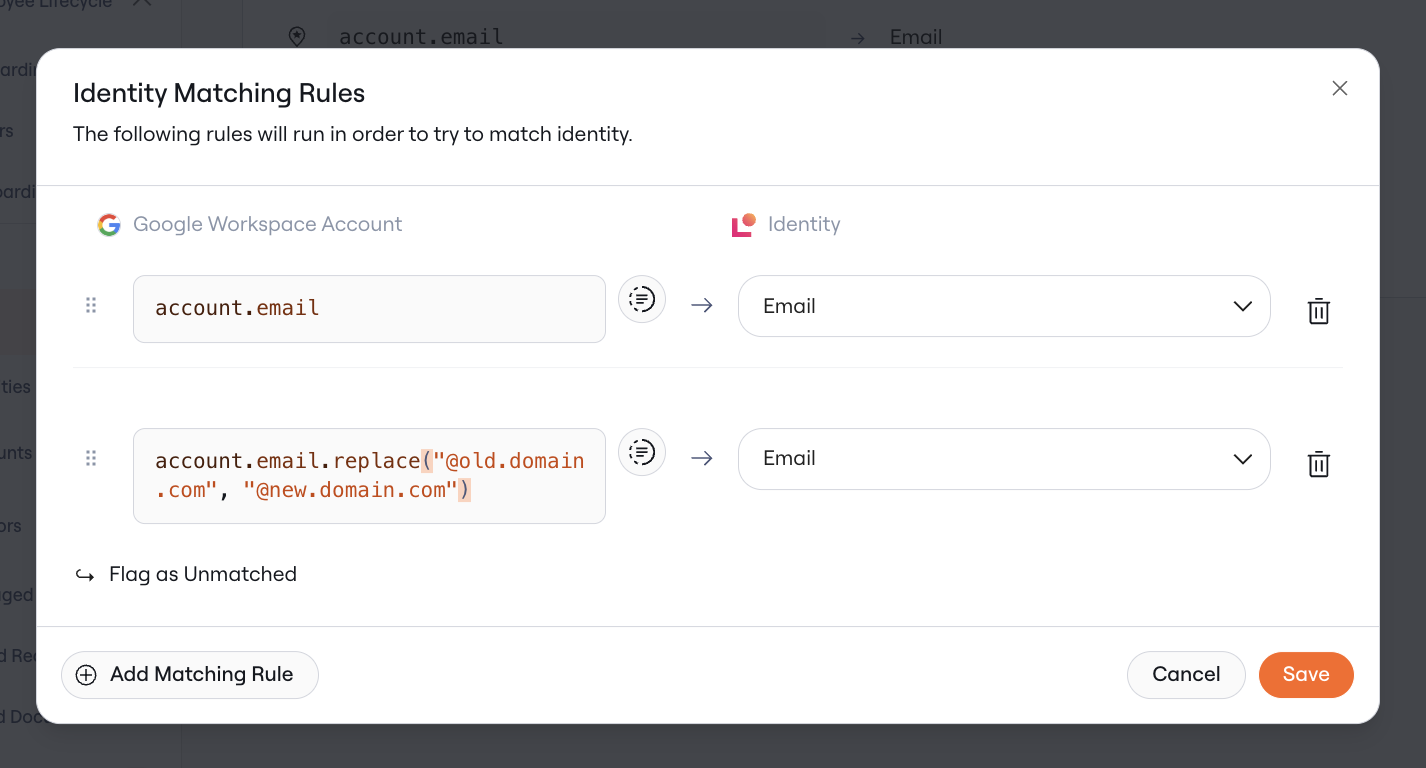
To create additional matching rules or edit the existing ones, click the pencil icon in the top right. You can configure multiple rules that will be evaluated in priority order until a unique match is found.
When adding a rule, you'll need to specify:
* **Account Field**: Choose which attribute from the discovered account to use for matching. When configuring this field, you can use the [Lumos Expression Language](/kb/_uncategorized/using-the-lumos-expression-language-in-workflows) to access data and handle any necessary transformations.
* **Identity Field**: Select which identity attribute to compare against. Supported fields include email, username, given name, family name, and any custom fields configured in your environment
### 2. Review Your Default Rules
Every application starts with a default matching rule that compares the account's email address with the identity's email address. You'll see this rule listed as the first rule within the configuration.
### 3. Edit Matching Rules
To create additional matching rules or edit the existing ones, click the pencil icon in the top right. You can configure multiple rules that will be evaluated in priority order until a unique match is found.
When adding a rule, you'll need to specify:
* **Account Field**: Choose which attribute from the discovered account to use for matching. When configuring this field, you can use the [Lumos Expression Language](/kb/_uncategorized/using-the-lumos-expression-language-in-workflows) to access data and handle any necessary transformations.
* **Identity Field**: Select which identity attribute to compare against. Supported fields include email, username, given name, family name, and any custom fields configured in your environment
 ### 4. Preview Expression Results (Optional)
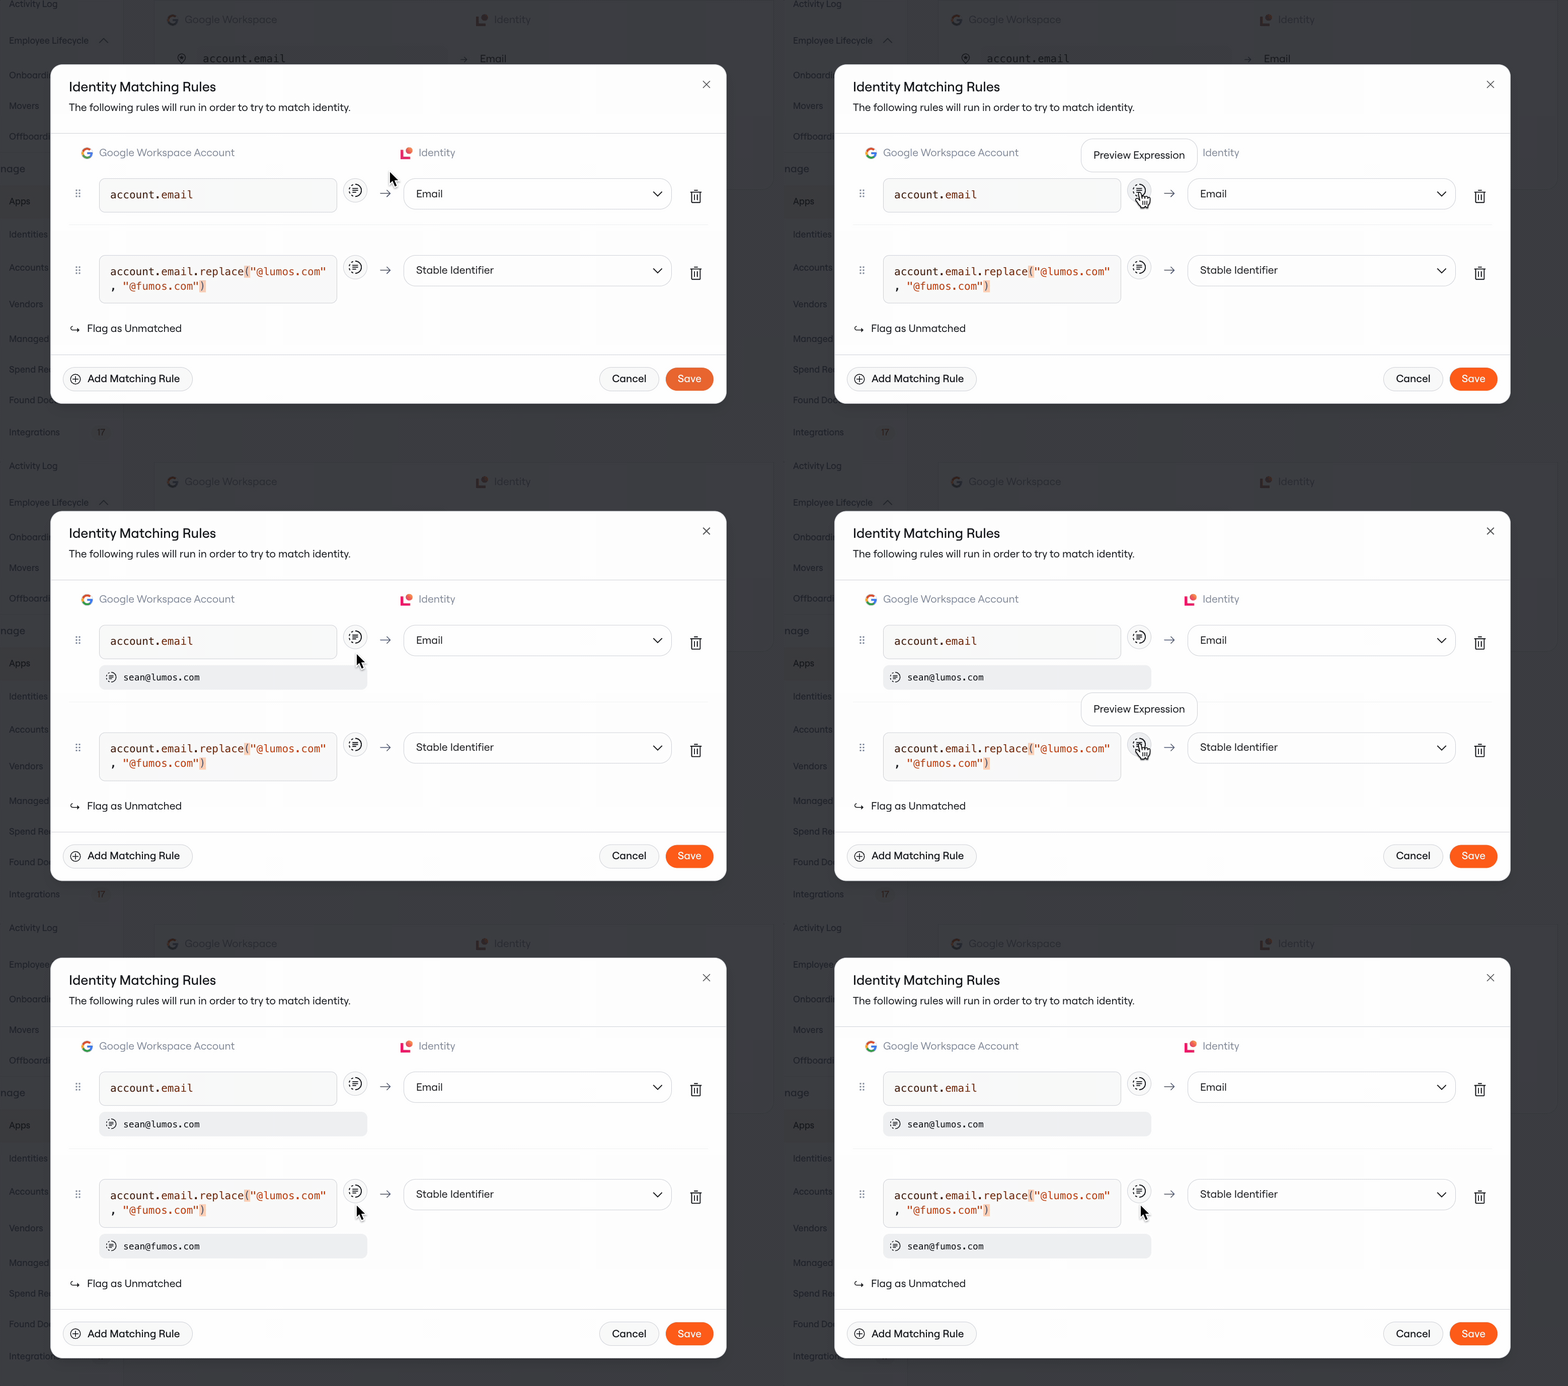
If you're using more complex expressions in your matching logic, you will likely want to preview the outputs of the expressions. In order to do that, you can click on the preview button next to each input.
This will show you the results for your account, if you have one in the application. If you do not have an account in the application, Lumos will choose an account at random to preview.
### 4. Preview Expression Results (Optional)
If you're using more complex expressions in your matching logic, you will likely want to preview the outputs of the expressions. In order to do that, you can click on the preview button next to each input.
This will show you the results for your account, if you have one in the application. If you do not have an account in the application, Lumos will choose an account at random to preview.
 ### 5. Set rule priority
Rules are evaluated in the order they appear, from top to bottom. Use the drag handles to reorder rules by priority. The first rule to return **exactly one matching identity** will be used.
### 6. Save and monitor
Once you're satisfied with your rules, click "Save Changes". New accounts discovered after this point will use your updated matching configuration.
**Important**: Once a match has already been made, Lumos will not attempt to re-match the account to a new Identity based on more recent matching rules. However, the system will always attempt to rematch an "unmatched" account using new rules on the next sync.
***
## Common Use Cases
### Handling Domain Transitions
If your organization recently changed domains, you may want to create a rule that transforms old email addresses:
```
Account Expression: account.email.replace('@oldcompany.com', '@newcompany.com')
Identity Field: Email
```
### Matching GitHub Usernames
For applications like GitHub that don't provide email addresses:
```
Account Expression: account.username
Identity Field: GitHub Username (custom attribute)
```
### Matching On-Premises Systems
For systems that use Active Directory usernames:
```
Account Field: account.username
Identity Field: sAMAccountName (custom attribute)
```
***
## FAQs
**What happens if multiple rules match the same account?**
Rules are evaluated in priority order. The first rule that returns exactly one matching identity will be used. If a rule returns multiple potential matches, it is skipped and the next rule is evaluated.
**Can I delete the default email matching rule?**
Yes, although every application must have at least one valid matching rule. You can edit the default rule or add additional rules with higher priority, but you cannot delete all matching rules.
**Will changing these rules affect existing matched accounts?**
No, Lumos never automatically re-matches existing accounts. Changes only affect newly discovered accounts, or accounts that are not yet matched to an Identity from an authoritative user source.
**What if I make a mistake in my matching rules?**
You can edit or reorder rules at any time. Use the preview feature to validate your changes before saving. If you notice issues after saving, you can update the rules and reach out to the Lumos team to trigger a full re-matching process.
**How do I know which custom attributes are available for matching?**
Available identity attributes depend on your identity provider integration and any custom fields you've configured in Lumos. The set of fields configured in your environment will show up in the Identity Field dropdown. If you want to make additional fields available, you can do so in your [Source of Truth](/kb/appstore/source-of-truth/source-of-truth) settings.
***
## Need Help?
If you're having trouble configuring identity matching rules for your specific use case, reach out to your Customer Success Manager or contact [support@lumos.com](mailto:support@lumos.com).
### 5. Set rule priority
Rules are evaluated in the order they appear, from top to bottom. Use the drag handles to reorder rules by priority. The first rule to return **exactly one matching identity** will be used.
### 6. Save and monitor
Once you're satisfied with your rules, click "Save Changes". New accounts discovered after this point will use your updated matching configuration.
**Important**: Once a match has already been made, Lumos will not attempt to re-match the account to a new Identity based on more recent matching rules. However, the system will always attempt to rematch an "unmatched" account using new rules on the next sync.
***
## Common Use Cases
### Handling Domain Transitions
If your organization recently changed domains, you may want to create a rule that transforms old email addresses:
```
Account Expression: account.email.replace('@oldcompany.com', '@newcompany.com')
Identity Field: Email
```
### Matching GitHub Usernames
For applications like GitHub that don't provide email addresses:
```
Account Expression: account.username
Identity Field: GitHub Username (custom attribute)
```
### Matching On-Premises Systems
For systems that use Active Directory usernames:
```
Account Field: account.username
Identity Field: sAMAccountName (custom attribute)
```
***
## FAQs
**What happens if multiple rules match the same account?**
Rules are evaluated in priority order. The first rule that returns exactly one matching identity will be used. If a rule returns multiple potential matches, it is skipped and the next rule is evaluated.
**Can I delete the default email matching rule?**
Yes, although every application must have at least one valid matching rule. You can edit the default rule or add additional rules with higher priority, but you cannot delete all matching rules.
**Will changing these rules affect existing matched accounts?**
No, Lumos never automatically re-matches existing accounts. Changes only affect newly discovered accounts, or accounts that are not yet matched to an Identity from an authoritative user source.
**What if I make a mistake in my matching rules?**
You can edit or reorder rules at any time. Use the preview feature to validate your changes before saving. If you notice issues after saving, you can update the rules and reach out to the Lumos team to trigger a full re-matching process.
**How do I know which custom attributes are available for matching?**
Available identity attributes depend on your identity provider integration and any custom fields you've configured in Lumos. The set of fields configured in your environment will show up in the Identity Field dropdown. If you want to make additional fields available, you can do so in your [Source of Truth](/kb/appstore/source-of-truth/source-of-truth) settings.
***
## Need Help?
If you're having trouble configuring identity matching rules for your specific use case, reach out to your Customer Success Manager or contact [support@lumos.com](mailto:support@lumos.com).